The Importance of Photographic Prints


The majority of us view images these days on our computers and phones, but it is becoming increasingly rare to actually view a physical copy of that image in person. 

While I love admiring landscape and travel photographs posted to Facebook and Instagram, the experience can't compare to viewing an image in print. Especially when it's a large print.

GalleryProof.jpg

There is something about seeing a physical representation of an image, the texture of the paper and the depth of colour that adds a completely new dimension. Even if you have seen the photograph before online, I find that its almost like seeing the image again for the first time.

Late last year I visited world renowned Australian photographer, Ken Duncan's gallery in Erina Heights, New South Wales. This was a revelation to me. I, like most people don't often have my work printed. Yes I have a couple of images hanging on my walls at home that I love, but the majority of my work can only be seen online.

Walking into Ken's gallery opened my eyes and gave life to a new inspiration and desire for photography that I had never felt before. It brought about the realisation that printing completes the cycle - From the eye of the photographer and the process to capture the image, to the digital post processing and finally the printing to create a piece of art. 
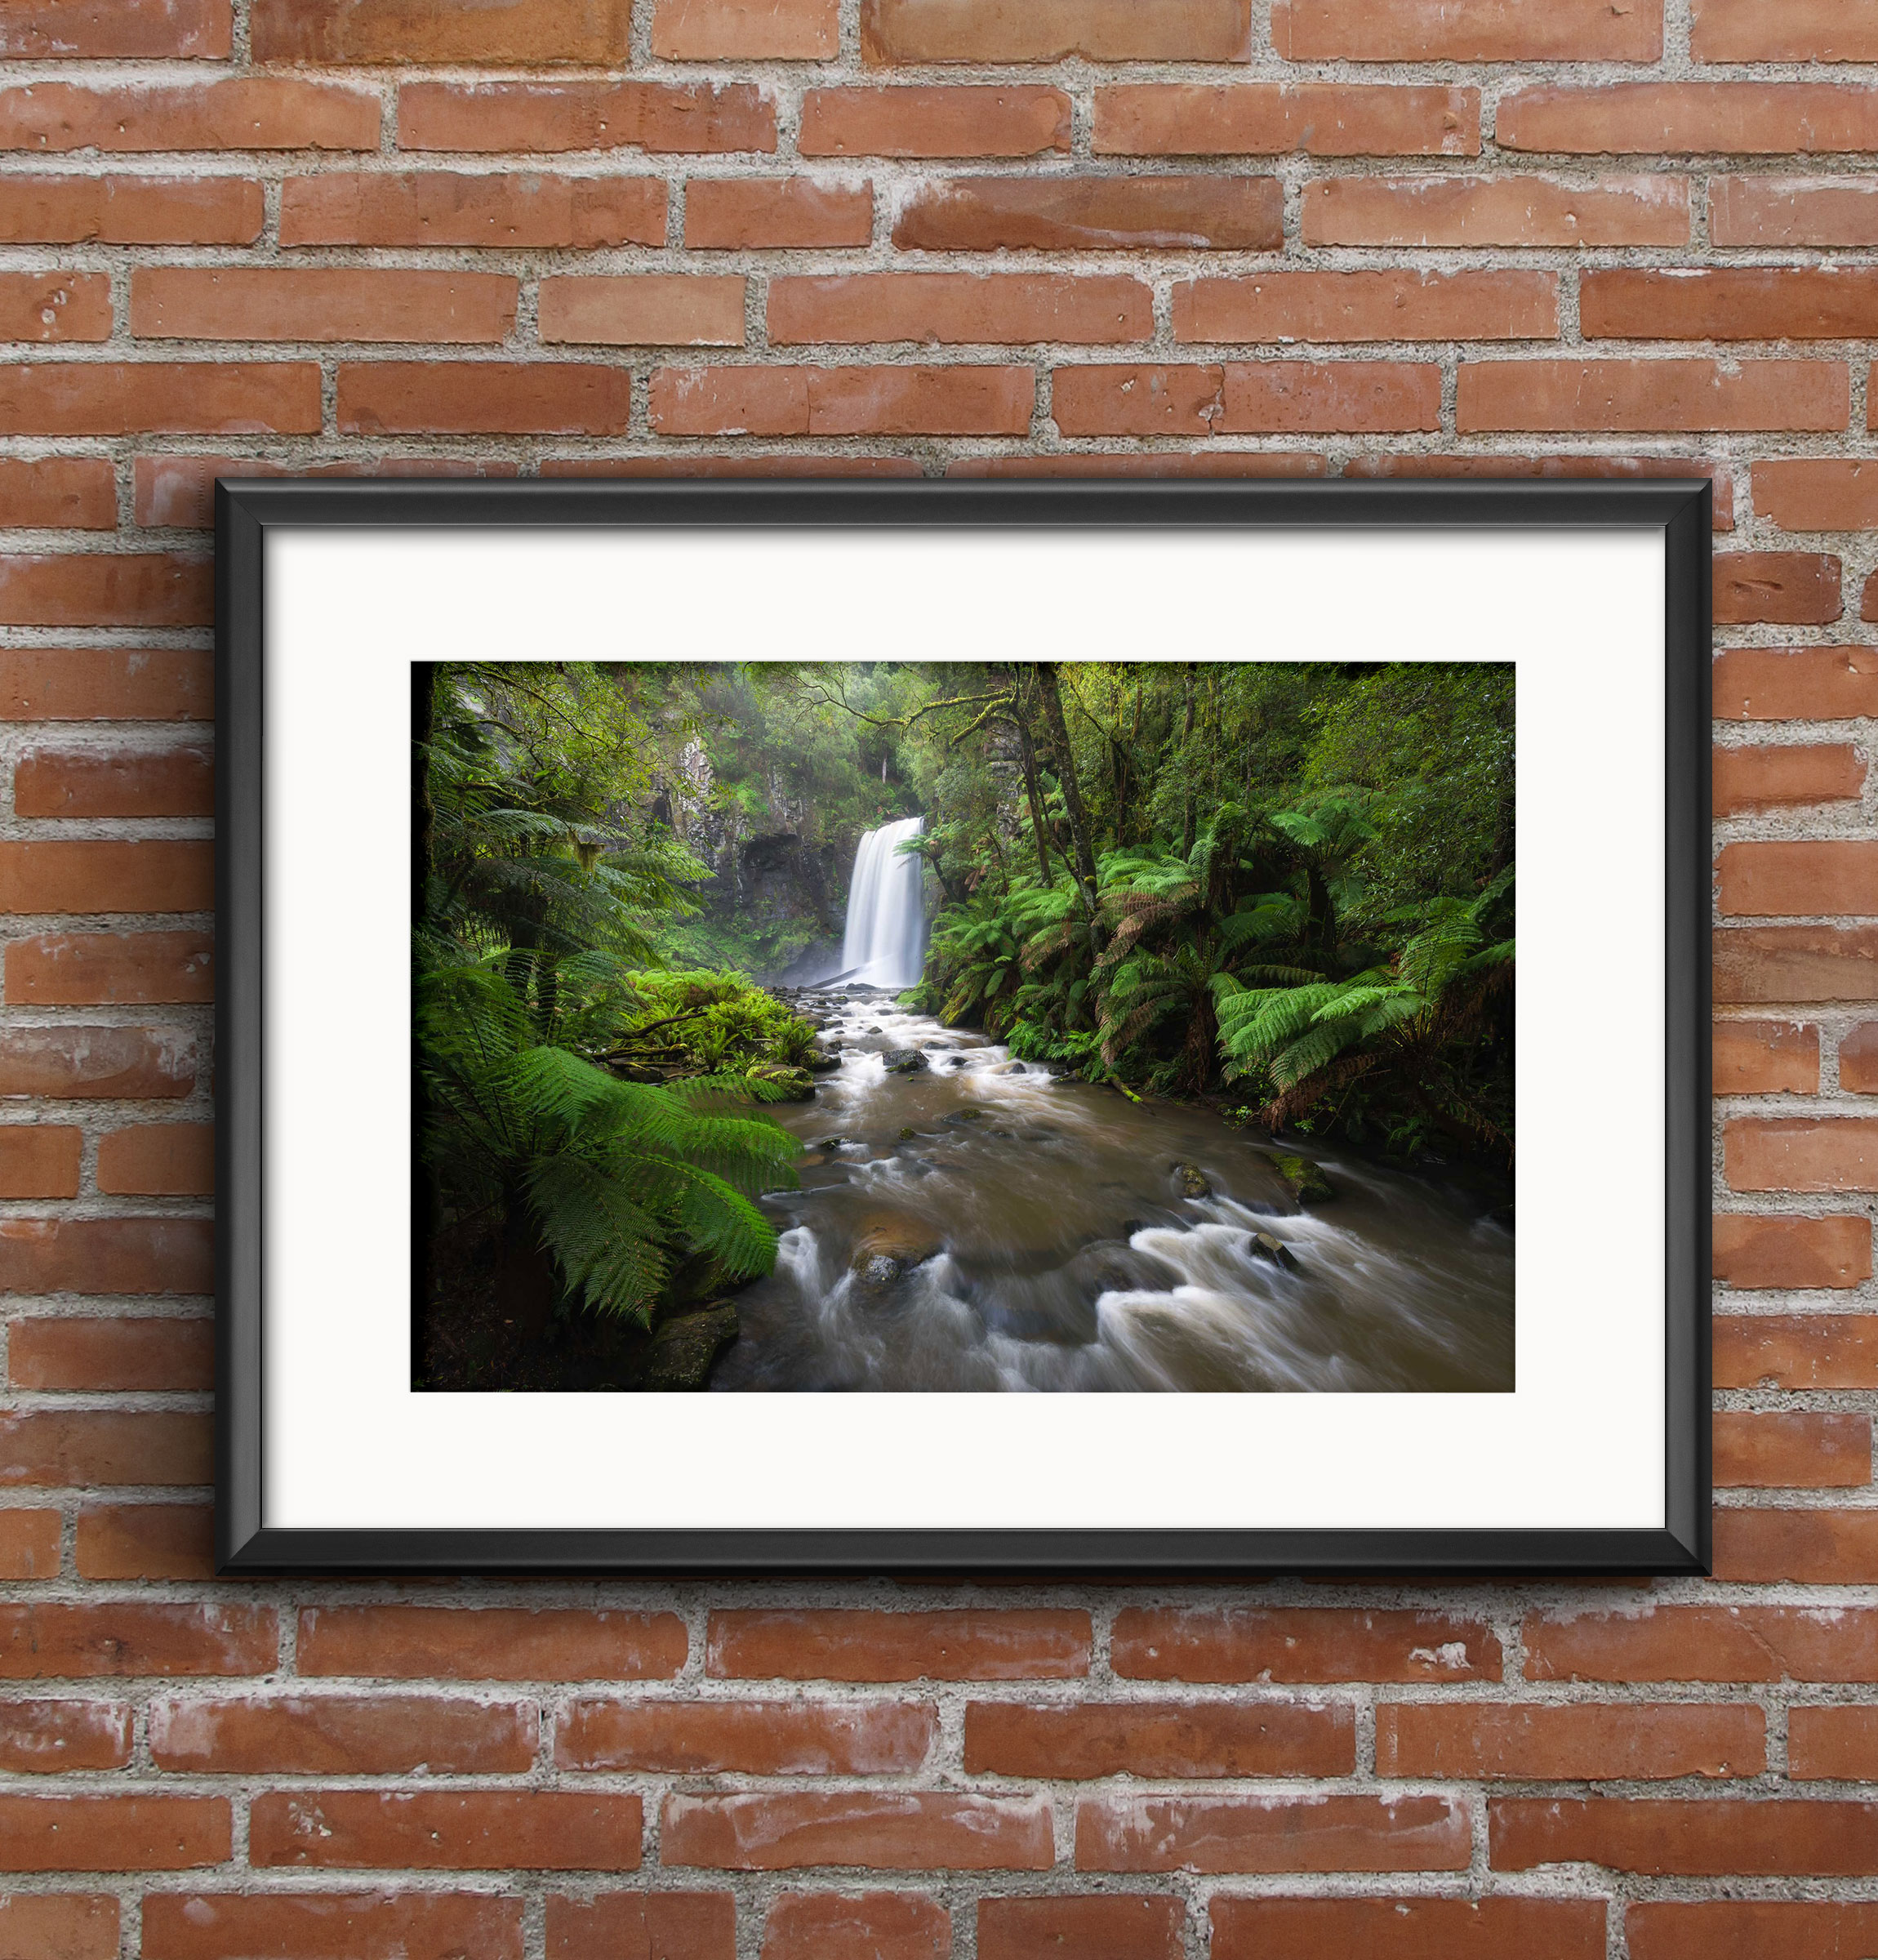
60x40 Canvas

60x40 Canvas

In our digital society, photographs are shared/consumed online and within 24 hours they're gone. Printing your photography gives your images a life of their own. They no longer have an expiration date. For all the work that goes into making an image, it's a shame that after the initial post to social media, they then sit on our hard drives, never to be seen by anyone else again.

If you are a photographer, whether as a hobbyist, enthusiast or professional - you need to experience your own work in print.

While I know that 85-90% of my work will continue to be in a digital format, I don't think it will ever compare to the addictive rush of seeing a completed large scale print. 

To finish off, check out this great video from one of my YouTube favs Peter McKinnon on why you need to be printing your photos.

NEW! Lightroom PRESET PACK: https://sellfy.com/p/QjNY/ - Edit your photos with 15 brand new presets! Colour Graded with my PM LUTS Pack : https://sellfy.com/p/EaHg/ The Music I use: https://goo.gl/IMZC9A - AMAZING for YouTubers My Crazy high Res Printer : http://amzn.to/2pbohYa What's up guys!! Have you ever wondered if you should be printing your own photos?

If you are tired of looking at that empty wall in your home or the office, please consider browsing my galleries for the perfect image to complement your space. My work comes in a variety of sizes and mediums ranging from canvas, metal and standard fine art prints.  


Behind the Image - Infinity Pool

Location

This shot was captured along the banks of Lake Bonney in South Australia's Riverlands. Lake Bonney is well known throughout photography circles for its large, dead trees that line the shores. The trees ooze character and are the perfect subjects during a sunset or against a starry night sky.

Time

This image was taken after sunset. All of the bright light had gone and what remained was the beautiful pastel colours that often follow a sunset when cloud cover is minimal.

Quality of Light

I must admit that on this particular afternoon I was a little underwhelmed by what was going on in the sky. I can be a little bit of a 'cloud snob' sometimes and I had decided that I wasn't going to go and shoot because the sky looked boring. Fortunately for me, my wife is a great motivator. She insisted that I go out anyway and use it as an opportunity to get creative. So that's exactly what I did.

Equipment

I used a Nikon D800 with the Nikkor 16-35mm f/4G ED lens. On the lens I used a Nisi 3-Stop Soft Graduated ND filter and a CPL (circular polarising filter) with the Nisi V5 100mm Filter Holder. 

Inspiration & Process

Prior to leaving on our 6 month trip, I picked up a great pair of (for lack of a better description) gum boots. They weren't your typical gum boots as they were made from a wetsuit material and had a fantastic grip on the soles. Anyway, I thought that this would be a great opportunity to try them out. My idea was that if I waded out into the water away from the shallow bank, it would allow me to get closer to the trees and have them fill the frame in my shot.

The boots worked perfectly until I felt my toes starting to get wet and I realised that I had gone out a little too deep. This wouldn't have been such a problem if not for the fact that this was the middle of winter and the water was freezing :) After trying a couple of different compositions with the trees in the immediate vicinity, I decided that simplicity was the best way to go and I targeted just one tree. This tree's shape was perfect and when viewed with its reflection, created a great composition.

I knew that to get an almost mirror image at the bottom I would need to slow my shutter speed to take the ripples out of the water. My exposure couldn't be too long though because it would smudge the reflection. The other trick was to stand perfectly still in the water to minimise water movement. After experimenting with the shutter speed, I decided that an exposure of 1.6 seconds gave me the look I was after.

Lens Filters & Editing

For this image I used a 3-stop graduated ND filter by Nisi. The graduated ND filter darkened my sky slightly, while allowing me to extend my shutter speed. This gave me a nice, even exposure at the top and bottom of the image. I also used a Nisi CPL (circular polarising filter) to adjust the shot to get just the right amount of reflection. 

By using a graduated filter it meant that I didn't have to bracket my exposures and I was able to capture the scene in just one shot. All basic editing was done inside of Adobe Lightroom with final colour adjustments made in Color Efex Pro 2. 

Tips for Capturing a Similar Shot

My advice would be - don't limit yourself to only shooting when conditions are favourable and the skies look dramatic. The truth is that 80-90% of the time, the sky can look quite uninspiring and conditions are often unfavourable. If we only went shooting during these small windows of opportunity, we wouldn't be taking all that many pictures. The trick is to be creative with what you have to work with. 

Unfortunately I am really bad at following my own advice. For me I find that it helps to go shooting with a friend. A fellow photographer can help keep you motivated when nature isn't co-operating. Especially when you have to get up for sunrise and you don't feel like getting out of bed! 

Behind the Image - Duality


Behind the Image is a new blog series detailing my favourite shots and how they were captured. Through this series I hope to discuss the processes that I go through behind the scenes to make an image. Topics will range from what settings and gear were used, to how I approach a scene and what led me to capture that particular composition.

Nikon D800 | ISO 100 | f/10 | 17mm | 6 sec

Nikon D800 | ISO 100 | f/10 | 17mm | 6 sec

Location

I took this shot at one of my favourite locations in my home town. A place called Hedlow Creek. I live in a regional town in Queensland, Australia and this location is only about 20 mins from my house. What draws me to this area is the wide open spaces and the fact that you can spend hours here and not see another person. It's the perfect spot to unwind in nature.

Time 

This was taken around 5:30am, just before the sun met the horizon. 

Lighting 

When I'm shooting at sunrise or sunset I always look for clouds to help add drama and interest/colour to the sky. The great thing about shooting just before dawn is that even when there are no clouds, you can get amazing colour gradients in the sky. This type of light was perfect for this scene as it worked really well with the reflections in the water. Clouds in the sky would have made the image too busy and removed the overall simplicity of the composition. 

Equipment

I used a Nikon D800 with the NIKKOR 14-24mm f/2.8G ED lens and a Benro Travel Angel II Tripod.

Inspiration 

When I approached this scene, I was standing on a wooden platform just above the water. The first aspect I noticed straight away was the stillness of the water which created a perfect mirror image of the sky and tree line. The other was the thin layer of fog forming across the water. I decided that the perfect way to capture this scene would be to keep my composition as symmetrical as possible and place the horizon line almost in the middle so that the standout feature of the shot would be the reflections. An easy way to line up shots perfectly on the back of your camera is to use the Live View on your LCD screen and turn on the Grid view.

Lens Filters & Editing 

The 14-24mm lens that I used for this image is not compatible with any lens filters I own. It requires the use of a custom filter holder (which I don't have), so in the absence of a graduated neutral density filter, I bracketed my exposures. There wasn't much dynamic range in the scene but I wanted to make sure that I had enough detail in the shadows and colour in the foreground. I ended up using 2 of the exposures from the bracketed shots which I initially made adjustments to in Lightroom and blended them together in Photoshop using layer masks. Once I had combined the exposures, I made final colour adjustments in Color Efex Pro 2 from the Nik Collection by Google. 

FYI - All the Nik Plugins are FREE. They are fantastic tools and I use them all the time. Check them out here - www.google.com/nikcollection

Tips for Capturing a Similar Shot

My advice would be...make sure you have a steady tripod and a wide lens. You would also need to have similar weather conditions to get a shot with mirrored reflections. The water will need to be completely still as ripples will ruin the reflection effect. You could smooth out the water with a longer exposure however this will also remove the mirrored image of your subject. You may also want to use either a Graduated ND filter or bracket your exposures, depending on the dynamic range. 


Top Locations From Our 6 Month Roadtrip


So as you may have guessed from my Facebook posts, we have returned home from our big adventure, albeit a little early. The plan was originally 6 months however as the mercury was starting to rise and the roads were getting busier, we decided that it was time to return home. Not that we had stopped enjoying ourselves….far from it (who wouldn't enjoy traveling around the country for 5 months) but we missed our family and once you start heading in that homeward direction, it’s hard to step on the brakes.

Regardless of the early return, we could not have asked for a better trip. We truly do live in one of the most beautiful countries in the world. I always knew we had some amazing natural wonders here, but you can never truly appreciate how amazing until you visit them. There are other great places all over the globe, however the furtherest abroad I have ever been is New Zealand and before jet-setting to anywhere else, I really wanted to experience what we had on offer in our own backyard. 

I already have plans on where I want to go on our next trip! Autumn colours are calling me :) 

Now that we have returned though, I really wanted to put together a post detailing some my favourite locations and images from the trip. The hard part though is deciding which locations to cover. Hopefully what I have included below will serve to not only show where we travelled but help you out with planning your own adventures.

Carnarvon Gorge - Queensland

Carnarvon is one of those places with so much to offer that it would be impossible to see it all in one visit. It is a place that I have explored many times over the last 5 years and I still can’t get enough.

On this particular trip I climbed up to Boolimba Bluff (something I hadn’t done before) and I was fortunate enough to witness one of the best sunrises I have seen in a long time. It’s always a gamble that the light isn't going to be right when you have to hike so far to get to a particular shoot (especially when that hike involves so many steps), however on this occasion my hard work was well rewarded.

For accommodation at Carnarvon Gorge, my recommendation is Takarakka Bush Resort. They have numerous options ranging from caravan/camping to cabins and studio rooms.

Boolimba Bluff @ Sunrise, Carnarvon Gorge

Boolimba Bluff @ Sunrise, Carnarvon Gorge

Flinders Ranges - South Australia

How do I sum up the largest mountain range in South Australia?! The word EPIC comes to mind a lot. With over 430kms of spectacular vistas, its hard to not come away in awe of the sheer size of this place. I wrote a post on this area earlier in the year (which you can read here) so to save repeating the same information, I will just say this - YOU NEED TO GO TO THE FLINDERS! and if you are a photographer YOU DEFINITELY NEED TO GO TO THE FLINDERS!!

For more information on the Flinders Ranges or Wilpena Pound go to www.southaustralia.com and www.wilpenapound.com.au

Razorback Lookout @ Wilpena Pound, Flinders Ranges

Razorback Lookout @ Wilpena Pound, Flinders Ranges

Lake Bonney, The Riverlands - South Australia

If you are into Astrophotography, then Lake Bonney really needs to be on your list of locations to shoot. Lake Bonney is located near the town of Barmera in the Riverlands region of South Australia, approximately 230 kms from Adelaide. If you strike the right conditions with clear skies and low wind you can expect to get some great shots! You can free camp right beside the lake and while there are no facilities, you can’t beat the views.

Standing outside our caravan, almost knee deep in the water, I felt like I was surrounded by stars. You could see them in the sky and also their reflections in the water. It was almost as if the sky and the water were connected in one endless space of celestial light.

Milky Way panorama @ Lake Bonney, Riverlands

Milky Way panorama @ Lake Bonney, Riverlands

Murphys Haystacks, Eyre Peninsula - South Australia

Murphy's Haystacks on the Eyre Peninsula are Stonehenge-like, natural rock formations known as inselbergs. These uniquely shaped granite boulders are located 40kms south-east of Streaky Bay. There are a number of small groups of these in the area right in the middle of a farmers field! Their name originated when a traveller in a coach saw the formation from a distance. He thought the mounds to be bales of hay and he asked how a farmer could produce so much. As the farm was on a property owned by a man called Murphy, the rocks became known as Murphy's Haystacks. 

The property owner allows self contained travellers to camp there for the night for a small fee of $10. Well worth the money as it allows you to be there to capture both sunrise and sunset. The farmer also produces his own honey and it is for sale there with an honesty box for payment. Do yourself a favour and pick up a bottle (or two) as it is the best you will ever taste!

Murphy's Haystacks, Eyre Peninsula

Murphy's Haystacks, Eyre Peninsula

The Great Otway National Park - Victoria

The Otway waterfalls have been on my ‘must see’ list for some time and I was so excited to be able to see them. The falls are a relatively short drive north-east from the Great Ocean Road and there are 3 main locations that you should visit. These are Triplet Falls, Hopetoun Falls and Beauchamp Falls. 

I was fortunate enough (or unfortunate, depending on if you like staying dry) to photograph them during lots of rain, so the falls had a decent flow and the overcast weather made for great shooting conditions. The weather proofing on my gear was definitely put to the test that day! I must admit that despite the rain, I was having a fantastic time however my kids (who were soaking wet) did not share my enthusiasm :) 

For info on what gear I used and how to best shoot the Otway waterfalls, check out this previous blog post

Hopetoun Falls, Great Otway National Park

Hopetoun Falls, Great Otway National Park

Ladies Bath Falls, Mount Buffalo - Victoria

Ladies Bath Falls, Victoria

Ladies Bath Falls, Victoria

Ladies Bath Falls is the first point of interest you will come across on the road leading up to Mount Buffalo in Victoria's High Country. Mount Buffalo has over 90km of walking tracks featuring panoramic scenery, waterfalls and amazing granite outcrops. The history behind this location states that ladies on their way to the chalet on top of Mount Buffalo during the 1930's and 40's would take a break during the long train journey from Melbourne to refresh themselves at the falls before the final leg up the hill.

On this particular day it was a couple of very brave teenagers that were attempting to take a dip in the alpine water. Summer was nowhere in sight, so needless to say there were a lot of chilled screams as they jumped in.

Empress Falls, Blue Mountains - New South Wales

When you love waterfalls as much as I do, adding the Blue Mountains to this list is a ‘no brainer’. The Blue Mountains are approximately 2 hours drive inland from Sydney and are home to some of Australia’s most iconic landscapes and waterfalls. My favourite spot up there is Empress Falls along the Wentworth Falls circuit in the Valley of the Waters. I spent hours there just exploring different angles and compositions. It was an overcast day so the light down in the valley was perfect. There was a steady flow of people coming through but there are plenty of places to shoot from without having to worry about anyone getting in your shot.

There are over 900 stairs down to this location however it is definitely worth the effort. Plus there is a coffee shop/restaurant back up at the carpark so you can recharge with some food and a caffeine hit when you get back. Also, just before I captured this image I had the opportunity to watch a large canyoning group abseiling down from the top of the falls. If I had more time in the area I would have loved to give it a go. It looked like an awesome adventure!

Empress Falls, Blue Mountains

Empress Falls, Blue Mountains

Camel Rock, Bermagui - New South Wales

A short drive from the quiet little coastal town of Bermagui in New South Wales and you come to 3 craggy peaks rising up out of the ocean, commonly known as Camel Rock. The formation was named by Bass and Flinders during the first mapping of the coastline of New South Wales. 

Taking unique images in this location is largely dependant upon the tide as particular viewpoints can only be accessed at certain times of the day. If you plan on visiting this location to shoot, be sure to check the tide times first. Sunrise is probably the best time of day to get some great light here but I have also taken some nice shots at sunset as well.

Camel Rock, New South Wales

Camel Rock, New South Wales

In total, over the 5 months that we were on the road we covered approximately 15,000kms. Initially this may sound like a lot, but compared to the rest of Australia it's barely scratching the surface. In a country that has so many diverse landscapes, it's easy to see why so many people are on the road touring Australia. I can't wait to set off and join them on our next adventure to explore the rest of what this great country has to offer!


Chasing Waterfalls in the Otways

 
Top Lookout: Triplet Falls - Nikon D800 @ ISO 100 | f/16 | 17mm | 1/4 sec

Top Lookout: Triplet Falls - Nikon D800 @ ISO 100 | f/16 | 17mm | 1/4 sec

Since the first time I picked up a camera I have wanted to photograph the waterfalls in Victoria's Great Otway National Park. Images of these majestic falls have filled my social media feeds for years and once we started planning this 6 month road trip, I knew that this was a place that I had to add to our itinerary. In this blog I will describe each of the falls and the walks down to them. At the end I have listed some suggested gear and settings for your photographs.

Triplet Falls

The three main waterfalls are located north-east from the Lavers Hill junction on the Great Ocean Road. From the junction along the Colac-Lavers Hill Road, it is only a 15 minute drive to the first of three which is Triplet Falls. The walk into Triplet Falls meanders amongst lush rainforest and features many a tiny subject for macro photographers to focus on. The track is quite an easy grade with steps in a number of locations. There are 3 viewing platforms once you reach the falls. Each will take you a little higher providing different vantage points through the rainforest. When you begin the walk you have the option to go left or right. The path to the right is a more direct route to the falls however my preference was to go left which takes you to the lowest point first and then moves up the falls to the top. In total, it will probably take approximately 35-45 mins return including time at each of the lookout platforms. Unfortunately there is a lot of thick forest between you and the falls, and on some of the platforms it can really obscure your shot. The best view of the falls in my opinion is from the highest platform.

Upstream from Triplet Falls - Nikon D800 @ ISO 100 | f/11 | 25mm | 2 sec

Upstream from Triplet Falls - Nikon D800 @ ISO 100 | f/11 | 25mm | 2 sec

Hopetoun Falls

The next location is Hopetoun Falls. Hopetoun Falls is definitely my favourite of the three and provides the most variety when it comes to compositions. The falls are located approximately 10 kms further east once you return to the main road from Triplet Falls. In this section the walk is not a long one (10-15mins to the bottom) but there are a significant number of steep steps which can be quite slippery after rain. A moderate level of fitness is required. Once you reach the end of the trail, you will find yourself at a large platform which provides an excellent view of the falls and access to setup for probably one of the more well known compositions. Depending on how agile you are, there is opportunity to climb down to ground level and follow one of the various well trodden tracks to get up closer to the base of the falls. You may even be able to shoot from a rock in the creek if the water level isn't too high. Because of the steps, the return walk may take up to 20-25 mins.

Main Lookout: Hopetoun Falls - Nikon D800 @ ISO 100 | f/11 | 16mm | 1/4 sec

Main Lookout: Hopetoun Falls - Nikon D800 @ ISO 100 | f/11 | 16mm | 1/4 sec

Beauchamp Falls

I've saved to longest walk til last! Well....it's not all that much further than the others but if your walking back up to the car park in pouring rain like I was...it can feel like an eternity 😀. Beauchamp Falls is relatively close in proximity to Hopetoun and while there aren't as many steps to the bottom, the gradual incline all the way down can be slippery and wearing on your knees if you aren't taking it slow. Once you reach the bottom there is a small number of steps that will lead you up to a platform that overlooks the falls from the side. Your line of sight to the falls is unobstructed and will provide an easy vertical composition. It can be tricky though to setup a tripod on the viewing platform because of the mesh floor. Your tripod legs will most likely fall through the holes so take care when setting up for your shot. The floor can also be quite bouncy so it is also best to try and capture your shot with no one else on the platform. Either that or ask them to stand very still (this can also be an issue on the platform at Hopetoun Falls).

Just off the main track: Beauchamp Falls - Nikon D800 @ ISO 100 | f/16 | 16mm | 1/8 sec

Just off the main track: Beauchamp Falls - Nikon D800 @ ISO 100 | f/16 | 16mm | 1/8 sec

Back down at the base of the steps there is a precarious track that will take you down to the waters edge. If the water level is low enough you can setup on one of the larger rocks in the water for a front and centre composition. Otherwise you can follow the water downstream for some alternative compositions. Keep in mind though that the further you go, the more obstructed your view of the falls will become. After heavy rain this side track can become quite muddy and slippery and I can attest to this after falling in the creek and almost losing a shoe in the mud myself 😆

Beauchamp Falls - Nikon D800 @ ISO 100 | f/8 | 30mm | 1/4 sec

Beauchamp Falls - Nikon D800 @ ISO 100 | f/8 | 30mm | 1/4 sec

Now let's talk gear! 

There are a number of photography tools that you can utilise to achieve some great results in these locations, however your primary 'must have' pieces of equipment (aside from your camera) will be a polarising filter and a tripod. The use of a tripod will keep your camera steady and help you to achieve longer exposures and sharper images. A polariser is instrumental in cutting through glare/reflections on water and can significantly increase colour and contrast in your image. Overcast conditions are also ideal for shooting waterfalls as it reduces the dynamic range in the light and makes capturing the scene a whole lot easier. Obviously you can't always rely on having the perfect overcast conditions, so to combat the large dynamic range created on sunny days you will need some additional tools. These can include a neutral density filter (ND filter) to allow for longer exposures to smooth out water in bright light, and a graduated neutral density filter (GND filter) to darken brighter areas at the top of your frame. I use Nisi Filters for the majority of my images. Their V5 filter system has a built in circular polariser and is great value for money compared to other brands. For waterfall images I would suggest using either a 3 stop or 6 stop ND filter depending on the amount of light and how smooth you want the water to be. For additional information on how to utilise a polarising filter or graduated and non graduated neutral density filters, head over to the Digital Photography School blog as they have some great tutorials.

Below Main Lookout: Hopetoun Falls - Nikon D800 @ ISO 100 | f/16 | 16mm | 3 sec

Below Main Lookout: Hopetoun Falls - Nikon D800 @ ISO 100 | f/16 | 16mm | 3 sec

In the images that I captured of these falls I only used a circular polariser (CPL). The conditions on this day were perfect as it was completely overcast with no additional sunlight. It was also raining which would have made using any kind of larger ND filters an onerous task as I would have been constantly having to clean them. As it was, the spray from the falls and the continual rain required me to wipe my CPL in between shots but the surface area is a lot smaller and easier to keep clean than the larger square filters.

My settings for these images were pretty similar for each shot. I predominantly used ISO 100 to ensure the least amount of noise, and apertures ranging from f/8 to f/16. For any compositions where I used a wide focal length with foreground interest I would use f/16 to keep as much in focus as possible from front to back of the image. Shots where I had zoomed in, I used f/8 or f/11 as longer focal lengths cause compression and layering which bring components in the image closer together, requiring less depth of field. The focal lengths and lens that you choose to use are completely up to you. For this shoot I chose to predominately shoot wide with a 16-35mm lens. My shutter speeds would vary between 1/8th second to 3 seconds depending on how smooth I wanted the water. It was also quite windy on the day so I would sometimes use shorter shutter speeds to limit the amount of blur in the trees as they were moving around quite a lot.

I realise that some of you may have questions in regards to the topics I have covered in this blog post and if you are keen to find out more, I am happy to talk anytime. Feel free to comment below, contact me via email or direct message me via one of my social profiles (Facebook, Instagram etc). 

Thanks for stopping by and I hope some of what I have written here will be useful to you.

View from Main Platform: Beauchamp Falls - Nikon D800 @ ISO 100 | f/11 | 25mm | 1/3 sec

View from Main Platform: Beauchamp Falls - Nikon D800 @ ISO 100 | f/11 | 25mm | 1/3 sec